After opening the application click on ![]() to gain access to the Collection Files tool-bar. This
tool-bar opens at the top right-hand portion of the screen.
to gain access to the Collection Files tool-bar. This
tool-bar opens at the top right-hand portion of the screen.
On this tool-bar click on ![]() button. The Collection Teams
screen will appear.
button. The Collection Teams
screen will appear.
Collection teams created under a specific Collection will have access to the Collection and can perform various activities associating the Collection, depending on the permission given. Members of a Collection team are included from the Contacts (Address Book).
Follow the given procedure to access the Collection Teams screen:
After opening the application click on ![]() to gain access to the Collection Files tool-bar. This
tool-bar opens at the top right-hand portion of the screen.
to gain access to the Collection Files tool-bar. This
tool-bar opens at the top right-hand portion of the screen.
On this tool-bar click on ![]() button. The Collection Teams
screen will appear.
button. The Collection Teams
screen will appear.
Screenshot displaying a Collection Teams screen along with explanation is given below:
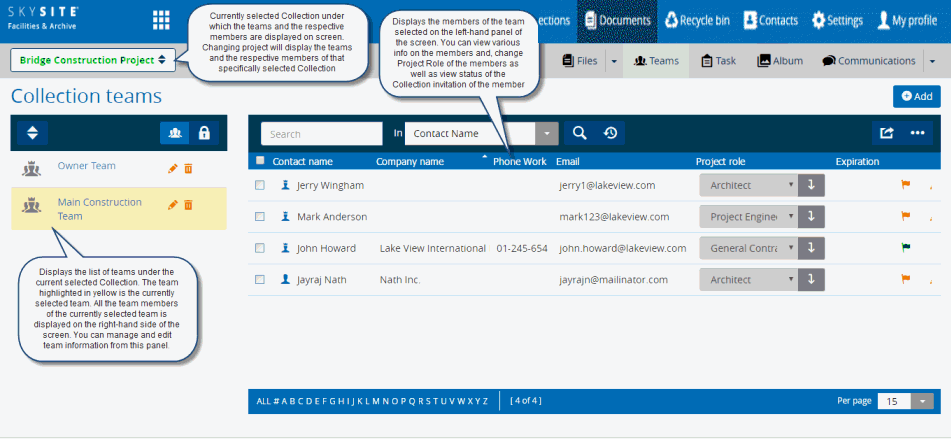
The following operations can be performed on teams (from left-hand panel):
Click on any team name to view the team member under that particular team on the right-hand panel.
Edit any team by clicking
 button
Delete any team by clicking
 button
Click  button to create a new
team. Details are given in the Creating
New Team help file.
button to create a new
team. Details are given in the Creating
New Team help file.
The left-hand panel displays the team members who have accepted Collection access, rejected Collection access invitation and not yet responded to Collection invitation.
Note:
Collection here means
the current
Collection under which the Collection
Teams screen
has been opened up i.e. the Collection displayed here:  at the top of the screen. Any new team created will have exclusive access
to this (selected) Collection only.
at the top of the screen. Any new team created will have exclusive access
to this (selected) Collection only.
The following operations can be performed on team members under any selected team (from right-hand panel):
View the Contact (Team Member) name, company to which the member is an affiliate, work phone, email address, Expiration Date after which the Collection access of the member will be terminated.
Refresh Team member
panel displaying the member details row-wise by clicking  (Refresh
button). We generally click the refresh button when we intend
to reload the current screen and the browser look for updated version
of that particular screen and display the list accordingly. Hence,
refreshing the list will fetch the latest version and the list gets
reloaded.
(Refresh
button). We generally click the refresh button when we intend
to reload the current screen and the browser look for updated version
of that particular screen and display the list accordingly. Hence,
refreshing the list will fetch the latest version and the list gets
reloaded.
You can enter search
string with Search textbox,
then select any of the properties of Team Members such as Contact
Name, Contact Last Name, Company Name, Email or
Response Status and then click on  (Search button) to carry out the
search. If you select Contact
Name then the application will search the entered string among the
various Contact Names of the team members.
(Search button) to carry out the
search. If you select Contact
Name then the application will search the entered string among the
various Contact Names of the team members.
Click on
 (Reset button) to revert any changes you have made.
Click on  (Add
button) to create a new team.
(Add
button) to create a new team.
Click on  (Export
button) to export the list of team members in
CSV format or directly in an Excel
spreadsheet.
(Export
button) to export the list of team members in
CSV format or directly in an Excel
spreadsheet.
Click on  (More
button) to Accept
Response of Collection invitation on behalf of team members
who have not yet accepted Collection invitation, Resend
Notification for member addition to a collection, add team member(s) from address book, add existing
team member(s), add new team member after entering that member information,
delete members from team or
Send Messages to
team members who have already accepted Collection invitation.
Details are given in the Creating
New Team help file.
(More
button) to Accept
Response of Collection invitation on behalf of team members
who have not yet accepted Collection invitation, Resend
Notification for member addition to a collection, add team member(s) from address book, add existing
team member(s), add new team member after entering that member information,
delete members from team or
Send Messages to
team members who have already accepted Collection invitation.
Details are given in the Creating
New Team help file.
Change the Collection
of a team member from the Collection Role drop-down. Click on  button
to copy down the selected Collection Role of one team member among
other team members (this reduces the hassle of selecting Collection
Role of different team members separately).
button
to copy down the selected Collection Role of one team member among
other team members (this reduces the hassle of selecting Collection
Role of different team members separately).
Edit response of Collection
invitation send to any team member by clicking  (Flag
button). Green Flag means team member has already accepted Collection
invitation while Orange Flag means user has not yet responded to Collection
invitation & Red Flag means team member has declined Collection
information. Invitation status can not be changed to declined once
the Collection has been accepted but the opposite is true.
(Flag
button). Green Flag means team member has already accepted Collection
invitation while Orange Flag means user has not yet responded to Collection
invitation & Red Flag means team member has declined Collection
information. Invitation status can not be changed to declined once
the Collection has been accepted but the opposite is true.
Edit any team member
information by clicking button. Refer to
Add/Edit
Contact for more information.
Links:
Managing Teams/Team Members Permission
Deleting Collection Teams Members