Checking In Files
After
you finish working on the particular Collection, check-in and make the
file publicly available. If the file is not checked-in, the other user
with permission won’t be able to work on that particular file if required.
A file needs to be checked in to the application only if it has been checked
out before. A file before check in i.e. in check out state can be viewed
in the application. You cannot check in a file if it has been checked
out.
Follow the given procedure to check in the selected
file(s):
Select the already checked
out files from the specific folder in the list of Collection
Files.
Click on  (More button) at the top right-hand
corner of the screen. A number of options within a menu appear.
(More button) at the top right-hand
corner of the screen. A number of options within a menu appear.
Click Check
in files menu item. The Check
in Collection file(s) screen appears. This is shown below,
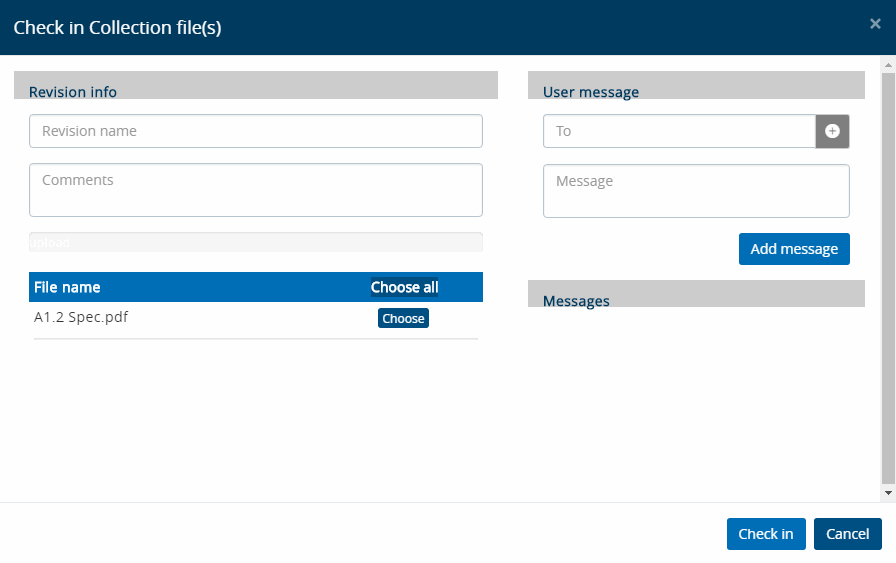
File name section
The selected files that you
want to check in are displayed in the grid section.
Revision Info section
Enter the Revision Name. This name will be
associated with the original file name to identify that the file content
has been revised and the revised file has been checked in to the application.
Enter
the 'Comments' which are to be made in favor of the changes made.
The comments may include what changes were made or why the changes
were made etc.
User Message Section
This section lets you add recipients to whom you
can send notification along with messages stating that the following files
have been checked in.
Once the Recipient(s) window opens up,
Select the team
from the Choose Collection team
drop-down. The contact details based on selection will be displayed
in the list.
Select the contact
names whom you want to add in the Recipients
section.
Click Add
Recipient(s). A confirmation message appears.
Click OK.
The contacts get added in the Recipients
section.
Click Close
to exit from the Recipient(s) window.
Messages
Section
This section displays the added contacts along
with the recipient to whom the message will be send. You will be able
to edit the message as well as delete the message from this section.
In
the end, click Check in
and the selected file(s) gets check in.
Links:
Accessing
& Understanding Collection Folder & File Screen
Manage View
Copying Files
Moving Files
Linking Files
Deleting Files
Downloading Files
Checking Out
Files
Uploading Files
Undo Pending
Changes
Viewing
Document History
Viewing Files
Manage File
Permission
Add/Modify Attributes
Setting
Alert for Folder/File
Searching Files