Click  [Import]
button. The Import Contacts
window opens up. This is shown below,
[Import]
button. The Import Contacts
window opens up. This is shown below,
Multiple contacts can be imported from a .xlsx file or a .csv file present in your local system to the Address Book in the SKYSITE Facilities & Archive application. Again, you can export contacts in bulk from the Address Book to your local system in .xlsx file or .csv file format.
Follow the given procedure to Import address book:
Click [Import]
button. The Import Contacts
window opens up. This is shown below,
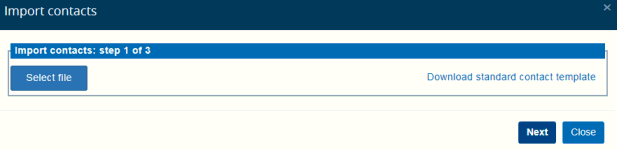
Select the source file from your local system by clicking the [Select File] button in Step 1 of the importing process. The application will accept contact data on a standard format only. If you do not have the standard format, then click on Download standard contact template link to download an excel sheet. After downloading you can copy your data in the excel sheet and standardize the data format according to what is given in the excel sheet. A sample data format which the system accepts without any error is shown below,

After you have selected the file for import, click Next to move forward to the next phase (Step 2) of the importing process. This is shown below,
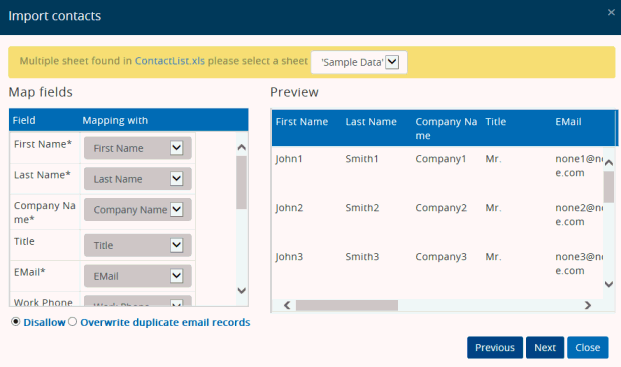
If you have multiple sheets in the file that you are importing, then select the appropriate sheet where the contact information is present with the right format, from the drop-down at the top.
You can map the Contact columns present in the application with those in the excel sheet at the Map Fields section. By default, the columns under the Field heading are the columns which appears one after the other on the Address Book - Contact List grid View section and the columns under the Mapping with heading on the selected drop-down are the order of the columns one after the other in the excel spreadsheet. The Preview section displays the contacts to be imported in the format specified in the sheet. As an example, during mapping if you change the mapping of First Name column to Email, then in the preview section, under the First Name column, the Email of the contacts will be displayed. Also if there is column info mismatch, that is, the order of the columns in t he sheet is different, then you can rectify the order from the drop-downs.
You can overwrite the records with the same name or disallow the duplicate one by clicking to select the appropriate radio-button for the Duplicate Records.
Click Next to continue. The importing process gets completed and the import summary is displayed in the Import Summary window. This is shown below,
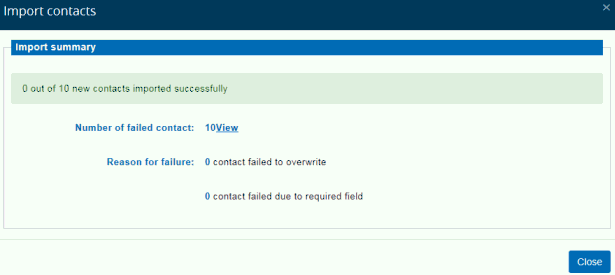
This screen displays the number of contacts imported successfully out of the total number of contacts present in the sheet. You can also view the number of failed contacts and the reason why the contact has failed to upload.
Click Close to exit.
Follow the given procedure to Export address book:
Select the contact(s)/group from the list of contacts. If you do not select any contact/group for exporting then the application, by default, will take all the contacts/groups in your address book for exporting.
Click  [Export]
button. The Export
Menu opens up.
You will have the option to download the list of contacts in
CSV format or directly in an Excel spreadsheet on your local system.
[Export]
button. The Export
Menu opens up.
You will have the option to download the list of contacts in
CSV format or directly in an Excel spreadsheet on your local system.
Click Export as CSV menu item to download and save the list of contacts in CSV format on your local system
Click Export as Excel to download and save the Contact list in an Excel spreadsheet.
Links: