Accessing & Understanding Collection
Home Screen
The
Collection Module acts as a discipline of planning,
organizing, and managing resources to bring about the successful completion
of specific Collection goals and objectives. Whenever a user creates a
Collection or assigned a Collection access, the user can upload documents
related to the Collection and within other folders and thus make the documents
available to other users, who can then review the user's document and
send him/her the feedback accordingly.
Follow the given procedure
to access the
The Collection
Home screen opens by default when you logging in to the SKYSITE
Facilities & Archive application.
If you navigating from other screens then
click on  at the top right-hand side of the screen to access the screen.
By default, the Collections falling under
Active category will be displayed under the grid.
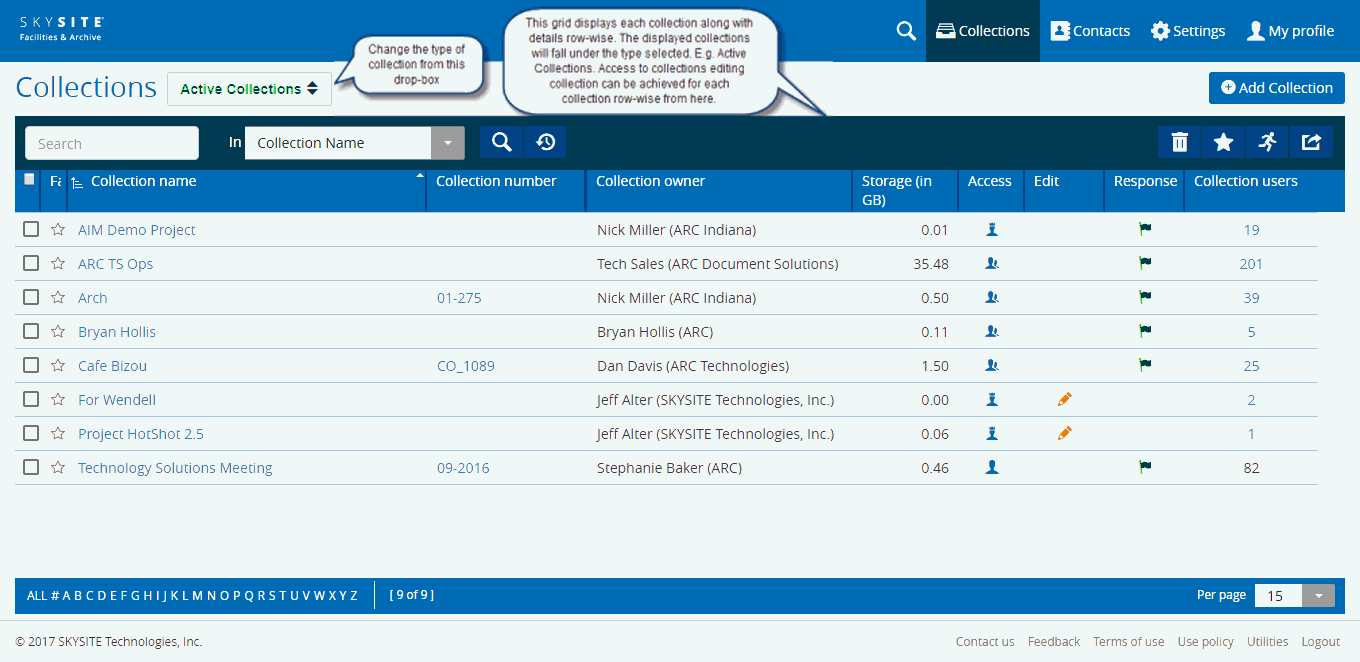
Screenshot
displayed below shows the Collection Home screen:

The
screen above displays each Collection details row-wise. The Collections
displayed falls under the selected category (only Active Collections are
displayed as per the screenshot above).
The Collection Number, Collection Name, Collection
Owner, the type of access you have to the Collection, option to edit the
Collection and Collection acceptance response shared by you to other users
is displayed in the grid section of the Collection list.
Note: The word "Collection" although hard-coded
in the application can be changed from back-end on user request. The alternative
words for Collection can be "Facility", "Project" etc. depending on customer choice.
Operations
which can be performed on Collections:
Click
on  to select the category
of Collections. Collections under the selected category will be displayed
in the grid section as a Collection list. The categories include Active, Favorite, Inactive & Archived
Collections. A newly created Collection always falls under
Active category unless otherwise during Collection creation the Add to Favorite Collection
checkbox is enabled, hence in this case the Collection will fall under
the Favorite Category. (More
Details: Adding New Collection).
The Collections can be transferred to Inactive and Archived Category
during editing the Collections (More Details: Modifying
Collections)
Click
on  button to create a new Collection
Select
Collection(s) by ticking the associated checkbox and click on  button
to delete the selected Collections
Select
Collection(s) by ticking the associated checkbox and click on  button
to mark a Collection as favorite. The Collections marked as favorites
will move into the separate category of Favorite
Collections. Need for this button arises from the fact that
a huge number of Collections may be there in the application (say
500), out of which you would access only 5. Hence, in order to reduce
the hassle of going through the list of Collections and then gaining
access to your Collection, mark your chosen Collection which you access
very frequently as favorites. This lets the application to move the
Collection into a separate category which you can access separately
without the hassle of scrolling through and searching for your Collection
within a huge list of Collections.
Click
on  button to
generate either file or user activity report.
Click on  button to
refresh the Collection list in the grid section. Hence, changes made
in Collection info during an intermediate period after logging on
will be reflected after refreshing the Collection list.
Click
on  button to
export the displayed Collection list in the grid section either in
CSV format or directly in an Excel spreadsheet
on your local system.
Option
to search specific Collections based on Collection Number, Collection
Name or other Collection parameters.
Activities on Collections at Grid section:
- Click
on Collection Number link
or Collection Name link to
view, upload, download or perform other operations on the Collection
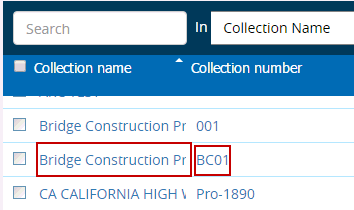
folders and files. Once you click on the Collection name or number
link you will be navigated to Collection Files screen. The link to
name & number of Collections is highlighted in the screenshot
below,

- The Collection
owner and the amount of space occupied by the Collection is given
under Collection Owner and
Storage (in GB) columns.
- Under
the Access column, the level
of the access that you currently have over certain Collections in
displayed. Moving your cursor (mouse pointer) over the symbols lets
you view the access permission levels. These can be Collaborative
User, Hosting User or Lite User. Details are provided here:
Working
with Manage Collection Role
- Under
the Favorite column, Collections
marked as favorites can be identified with a
 .
You can click on these stars to remove the Collection from the favorite
category.
- Click
on
 button beside each Collection to modify the Collection information.
Only if you are a Hosting User
will you be able to edit the Collection information.
- View the
Collection response (whether accepted, rejected, pending acceptance,
no access) under the Response column. The Collections to which have
accepted response have
 flag. You can view the response
details by clicking on the flag.
Details are provided here: Accepting Response.
- Click
on the number
of users link under the Collection
Users column to view
the name of the users and teams, associated with the collection on
the Collection team screen.
Note:
Most of the operations given above are explained separately in different
help files.
Links:
Adding
New Collection
Modifying
Collections
Searching
Collections
Exporting
Collections
Viewing
Activity Reports
 at the top right-hand side of the screen to access the screen.
 to select the category
of Collections. Collections under the selected category will be displayed
in the grid section as a Collection list. The categories include
  button
to delete the selected Collections
 button
to mark a Collection as favorite. The Collections marked as favorites
will move into the separate category of
 button to
refresh the Collection list in the grid section. Hence, changes made
in Collection info during an intermediate period after logging on
will be reflected after refreshing the Collection list.

 .
You can click on these stars to remove the Collection from the favorite
category.
  button beside each Collection to modify the Collection information.
Only if you are a
  flag. You can view the response
details by clicking on the flag.